§
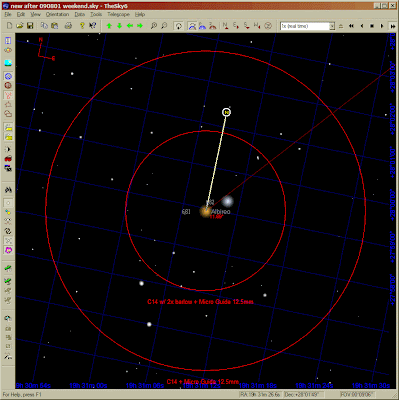
In TheSky6 I created a field of view (FOV) circle for the Celestron 14" SCT combined with the Celestron Micro Guide 12.5mm eyepiece.
It was at this point that I discovered a mistake in my personal telescope-eyepiece spreadsheets. I had noted the Micro Guide as a Plössl design with a 50° apparent FOV (AFOV); in fact, it is an Abbe orthoscopic type with only a 42° AFOV.
With this data, I was able to create the proper true FOV (TFOV). But as I viewed the virtual sky, I could not separate some target double stars. They were too tight. That didn't seem right...
When I suddenly remembered that I didn't have a Barlow factored in. Right! This would double the power but halve the field size.
It seems that TheSky6 does not have a quick and easy way of adding or activating a Barlow in the optical path so I simply create a new telescope, called "C14 w/ 2x Barlow," with twice the aperture. Now the doubles were closer, er, closer to me, more widely split.

Having corrected my telescope-eyepiece matrix spreadsheets, I also saw that final TFOV would be 0.065° give or take.
§
I considered staying with TheSky6 for capturing the sky images but I was a little worried that it might be out of date. I wondered if my Stellarium 0.9.x would have more current PA and sep. information. That said, TheSky6 has the nice little N-E indicator. This would definitely be handy for the upcoming work. And Software Bisque's tool allowed for infinite field rotation. That might prove helpful. But then I thought what's wrong with using both? I minimized TheSky6 and launched Stellarium 0.9.x. I'd be able to cross-check things.
§
I needed an image of the reticule inside the Micro Guide. There are photographs on some vendor web sites which are quite clear but the overall dimensions are small, maybe 500 pixels tall. I decided to use, while clearly photocopied, copied badly, and not perfectly round, the image within the Celestron documentation. At least with this image, inside the PDF file, I could scale up to a very large size. Which I did, up to about 1000 pixels. I captured the screen space with the Windows PrtSc function.
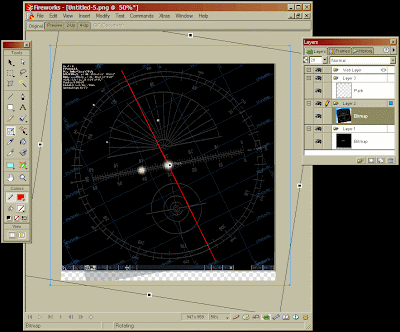
Then I launched my trusty old version of Macromedia Fireworks, created a new document (which automatically detected the dimensions of my recent screen grab command), and I pasted in the reticule. I inverted the colours in the image to white on black and cropped the extra bits from the screen snapshot. Using Fireworks's rubber stamp tool, I removed the big numbers, used as references in the documentation. The last thing I wanted to do was change the black background to be transparent. But after a bit of fumbling, I gave up on that...
I created an additional layer in the drawing. The intention was to superimposed the reticule atop the star field. Once I had the reticule in its own layer, I remembered that I could change the layer transparency. Ha ha! Solved that problem with a little workaround. I set it to 25% for a realistic view of the reticule, though white not red.
§
I pulled my updated lists of summer and winter double stars suggested by Sky and Telescope. I looked for some wide doubles. I thought it would be best to run my early simulations with some easy targets.
For some reason, I rejected ones that were optical. I don't know what made me think along these lines. But it wasn't until some time later that I realised it would actually be better, for simulation purposes anyway, to not choose stars in true binary systems. The orbital movement might confuse matters.
I settled on 61 Cygni (wide, slow moving binary system) for my first test. Switched to Stellarium. Searched for the constellation. Turned on the star names. There it was... Centred on 61. I remembered, off the top of my head, the command to type into the script box, to zoom to a precise level: zoom fov 0.065. Perfect. I miss this feature in version 0.10... I turned on the equatorial grid to help with orientation to north (since Stellarium does not have a little N-E indicator) and to verify the direction the stars would drift. I flipped on the horizontal inverting mode to simulate using a mirror diagonal. OK. The star field was ready.
I took a full snapshot of the screen in Windows and dropped it into the background layer in Fireworks. The reticule hovered, faint, atop the stars. The sizing of everything was pretty well bang on. Lookin' good!
§
When I realised that I'd needed to see clearly where the stars would drift to, I decided to use another layer. I created a third level in the Fireworks document and in this new layer, I then draw a straight line. I set it to a bright colour, 2 pixels wide.
With the subselection tool, I dragged the line endpoints so the bright line was parallel to the lines of declination in the background star image.

OK. I was finally ready to do my first double star measurement.
§
Every time at the telescope when trying the Micro Guide, I have spent time calibrating it. I didn't want to do this, this time. I was tired of doing that. I wasn't exactly sure if I could do it, simulate it rather, in the software. And I also considered that I could just use an approximation, based on the published specifications of the telescope and eyepiece... Eh, whatever. I was primarily doing this mock run so that I could refine Teague's advanced methods for measuring binaries. So, let's get on with it, I thought.
§
I eyeballed the PA of 61 Cygni to be around 90°.
90°, going CW from north in a mirror-reversed view. I had to double check my notes about this, which direction one should go. 90°, according to the Stellarium image. Which I noticed was very different than the image TheSky6. Huh.
(It was around this time that I noticed something odd in TheSky6. I think. Unless I'm going crazy. Which is always a distinct possibility. I noticed that Bisque's program suddenly rotated the view at a certain threshold of zoom level. I think what's happening here is when you're zoomed in really tight, the software puts north to the top of the screen; whereas, when you're zoomed out to the point where you can see the horizon, it adjusts the view so that the horizon is... well... horizontal. I dunno. That's my theory. Anyway, it jumps, big time, when you are zooming. But, all that said, you can rotate the field any which way you want so it doesn't really matter, I guess. It just threw me for a while.)
Where was I?
With the Scale tool in Fireworks, I turned the reticule image clockwise (CW) and counterclockwise (CCW) until I had the centre linear scale (LS) lines of the Micro Guide parallel to the line between the stars.
Using Teague's "better" method, I noted the number of whole divisions on the LS to be 9.
I turned the reticule until I had the 0 (zero) position along the large circular scale (LCS) near to the primary star. But I wasn't sure which 0 to use, the mark outside the LCS or inside. I decided to use the outer. In fact, it seemed to me that it wouldn't matter.
As per my notes, I twisted the reticule CCW and shuffled it about until I bisected the 2 stars with LS lines exactly 9 divisions apart. After the second or third time trying this, I came to realise that the angle could vary widely, depending how far along the next whole division the secondary star was. And I learned it wasn't a matter of putting each star along the 2 long lines of the LS; it was most important to get the tick marks along the centre of the stars. Sometimes that would put the long lines far from the stars.
I moved the reticule so a star lay in the middle of the LS, between the 30 marks. I simulated the star drifting out of the field by grabbing the thin bright line (previously aligned due east-west) and putting it over top of the centre of the reticule (and the star) and observing where the line crossed the western edge of the reticule's LCS scale. The angle was 184° (according to the outer markings).
Now, as per my interpretation of Teague's notes, I turned the CW (something niggling at my brain) until I had the 2 stars 9 divisions apart. I simulated the drift. The angle this time was 177° (outside marks again).
I punched these numbers in the little spreadsheet I had built into my Psion Series 5mx some time back. The sheet was a work in progress—it still needs a few IF functions to do everything automatically—but it works. It kicked out a number of 270.5° for the position angle. Whoa. Way off. Hey... add 90 and that's 360. Curious. I double-checked my formulae, the exit angles. I re-read Teague's notes.
It was then that I realised I had been flip-flopping on the inner and outer numbers. Oops! I re-measured the angles, aligning the 0 mark to the primary star and taking the two angles from the consistent side during the drift tests. OK. This time I got the angles 3 and 354. The spreadsheet said a position angle of 268 and change. Damn. I re-read the S&T article again. Ah. Found something not in my notes. Something that I had intended for the worksheet to do but that I had not yet built-in. Teague cautioned that if one angle was between 0 and 90 while the angle was between 270 and 360, you would need to add 360 to the smaller number.
I noodled briefly on how to revise my formula to accommodate for this. Bah. Leave it for later. I was anxious to see a correct result. I typed the numbers 363 and 354 into the cells. And was promptly rewarded with a PA of 448. What?! Back to Teague's dense notes. OK. If the resultant is more than 360, simply subtract 360. Ah. That I wove into a new IF function. Bingo! I got a PA of 88.5°, very close to the visual impression I had of the 2 stars.
The separation seemed to be OK. But that was a struggle to get the PA figured out...
All that said, I was a little perturbed that the PA of my image did not match that recorded by Haas. I knew it could have been a problem with Stellarium and the catalogs it is using. I resolved to not spend too much time worrying about it. As long as I got PA numbers close to what I was visually seeing, that was the objective. Oh. Sorry. No pun intended.
Let's practice that again!
I tried working with Albireo. And ending up getting very strange numbers. I could see visually the PA was around 50 with a sep. about the same at 61 Cyg. A little frustrated, I decided to start over. I recaptured the image at the correct scale. I made certain I knew where celestial north was. I made certain I knew which way the field would drift. And on re-reading the article by Teague once again, I noted a remark early on: you must use the inner numbers on the LCS for a mirror-inverted view. Oooh. OK then. My observations this time?
whole divisions: 12
angle 1: 304
angle 2: 348
The calculated PA was 56°. Woot! Nailed it.
§
The niggling thought crystallised. The rotation of the reticule CW from the line through the 2 stars should be the same as the angle CCW. If you measured another angle, but early on, before rotating the reticule, the centre-line, this would give you a handy clue, a little bit more data. So, I made a new note in my sequence of steps: After aligning the LS to the 2 stars, after estimating the whole divisions, centre on a star, let it drift, and note this preliminary angle. With my Albireo simulation, it was 326. Then, carry on with the rotational steps and measurements. The 304 and 348 results were both 22°, plus or minus, from the centre-line.
On one hand, this might suggest you only need to rotate the reticule and then drift once. You could infer the other measurement, then. But it's probably better to measure twice... Carpenter's rule?! Measure twice and note if they are about the same delta from the centre-line. If they're not, then it tells you, early on, you did something wrong.
This struck a cord. I remembered, while reading Teague's article the first time, about a possible "weakness" in his approach. He said: rotate, align, drift, record; then rotate the other way, "keep going," align, drift... As I read that, I thought, how could you get back to the exact parallel alignment between the two stars (especially if they were tight). If you were off a small amount, the distortion would skew all your calculations.
I think I've found a little self-check in the process.
§
Again! Yeah. Yeah. Again!
Target: ψ1 (psi 1) Draconis.
Eyeballed PA: 15.
Once again I made a lot of mistakes, not starting with the correct inner zero LCS orientation, having the drift direction wrong (at least this error would not happen in real observing). Finally got my ducks in a row.
whole divisions: 11
preliminary angle: 285
angle 1: 271
angle 2: 302
16.5 was the calculated PA. Yes!
§
I was feeling pretty comfortable with PA work. But the separation numbers seemed all over the place. In general, they were way too high. Went through Teague's instructions again. Looked very closely at my spreadsheet formulae. When it dawned on me. Of course the LS calibration is important! In all cases! No matter which method you use! This is a critical factor in Teague's final trigonometric calculation of the sep. What a dumbass.
OK then. Let's do some drift timings and see what we get.

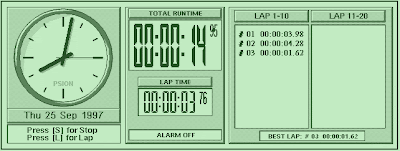
Hopped back to Stellarium. Turned on the disk viewport. I needed a star at a declination between 65 and 75°. Hello ψ1 Draconis! I was cued up and ready to go! Like I have done in the field, I fired up StopWatch on my Psion, activated the lap timer, and captured several timings across the entire virtual eyepiece field. I wasn't after high accuracy; just wanted to see I was in the ballpark.
I took a guess that the Micro Guide eyepiece field extended 20 units past each end of the LS. I multiplied the average drift time of 50.75 seconds by 6/8ths directly within the sweep time cell of my spreadsheet. After entering the declination decimal number, I saw the LS constant value of 2.92 appear.
And, in turn, the sep. value of 33.4 appeared at the bottom of my spreadsheet. Holy cow. It looked like I had the whole thing working correctly!
§
Rinse and repeat!
Target: κ (kappa) Herculis.
I estimated the sep. directly on the LS to be 10.1 ticks. The preliminary exit angle for the stars centre-line, on the inner scale of the LCS, was 282. The first angle at 10 whole divisions was 276; the second was 287. Everything was looking good so far.
Computer says...
PA 11.5° and sep. 29.4".
Wow.
§
That was a long battle. But a very good exercise. I was feeling tired but satisfied. Earlier I had considered Mizar for a test but rejected it. Now, I wanted to do it!
eyeball PA: 140
eyeball ticks: 5.7
preliminary angle: 59
angle 1: 40
angle 2: 71
This yielded a PA of 146° and a sep. of 15.18".
Haas says 153° and 14.3" (as of 2003).
Now I'm ready.


No comments:
Post a Comment