Warning: this is a long, meandering rant! There are a number of topics I'm tackling here and they're heavily intertwined. I'll try to make it as cohesive as possible.
§
I thought I'd tune up my Celestron Super Polaris (SP) equatorial mount. I've been thinking about it for a few days.
Something felt very odd when over at Cam's. I was worried I had broken a gear tooth. I don't know if it was just that I didn't have the counterweights on. I actually think a lock handle got really loose and jumped around. Anyway, I tweaked it today and it feels like it used to. Whew!
I've also been thinking about the missing plate or plaque on the declination setting circle and that I should replace it. If nothing else, etch the metal.
 MIA: declination pointer plate
As I closely examined the mount, I discovered another “depression” in the casing, this time surrounding the polar axis telescope eyepiece. It looked like another plate or ring has fallen off the telescope! Actually, I don't ever remember seeing this one. There's a chance (back in 1990) I bought it that way. The hazards of “as is” purchases, I suppose. Anyway, this observation sat in the back of my brain...
 MIA: hour graduation scale
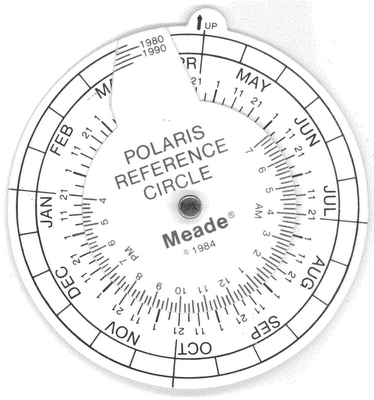
Coincidentally, while thinking increasingly about the freshening up of the mount, I started to tackle some other items in my astronomy to-do list, like: learn what the reticule in the polar axis scope means and how to use it, once and for all; and, update the old Meade Polaris Reference Circle.
§
If I remember correctly, my used telescope from Efston did not include a Celestron Polaris Guiding Plate. Page 5-50 of the
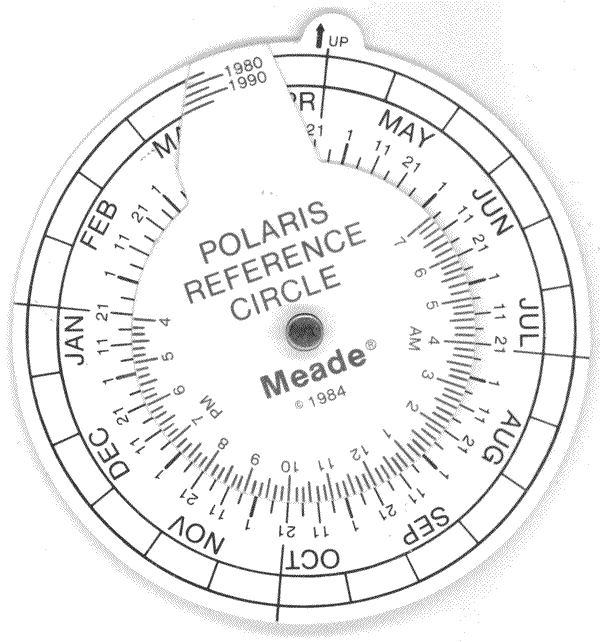
Celestron Schmidt-Cassegrain Telescopes Super Polaris C8 Instructions booklet refers to and shows this item. I called up Efston to see if I could buy this. They said they did not have that but the Meade Polaris Reference Circle would work. I must have bought it around 1991 or 1992.
 the old Meade circles
Now, the Meade Polaris Reference Circle is obsolete. In fact, it's over 10 years old! It only has tick marks (for precession) from 1975 to 1995. I decided to make a new one…
Using Adobe Illustrator 10 for Windows, I first made circles to exactly copy the current Meade. Wasn’t sure what to do with February so I based my calculations on 28 days. Everything on the time scale was off a little when I finished so I think it should be based on 29 now. Leave that for later, I thought. I applied some other cosmetic changes. But the big plan was to continue the precession scale for another ten years and then make the appropriate adjustments to the month scale to aid in alignment. Near the end of the mimicking phase, I printed out a draft, cut out the time circle, and put it over top the month circle, so to take it for a little “test spin.” It worked consistently with the old Meade which was good.
But when I compared this against the “actual” alignment in
RedShift it seemed way off... Even when I remembered that the polar scope (a simple refractor) would invert or rotate the view from what I was seeing in
RedShift, it was still not right.
I felt suddenly deflated! What a silly make-work project. Why did I waste hours doing this? Particularly because the polar axis scope has a built-in reticule for doing this alignment!
I decided to halt further work on the reference circle redesign. I would redirect my energy to learning how to use the mount's internal reticule.
§
The documentation that came with my 'scope is lacking.
It is very odd, I think, that the use of the integrated polar axis telescope is not addressed in the
Celestron Schmidt-Cassegrain Telescopes Super Polaris C8 Instructions booklet... OK. They talk about it; but over one or two paragraphs! There’s no image of the polar axis reticule. Sure, they talk about drift method, which would yield very precise alignment. But still it is curious that Celestron does not really talk about using the built-in hardware!
So I’ve never really understood the meaning of the reticule.
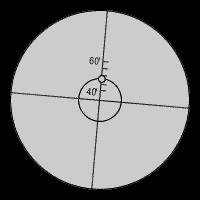 polar axis telescope reticule (drawing; not to scale)
On a hunch, I fired up
RedShift and zoomed into Ursa Minor. I oriented the display so that Polaris and NCP were vertically arranged. Then I continued zooming in such that NCP and Polaris were at the top and right edges of the screen.
RedShift tells the user what the size of the display is in degrees, minutes, or seconds. I could tell by the field of view that they were about 45’ apart.
So I think I’ve figured part of this out. The scale with the markings 40’ to 60’ is the distance from centre of the crosshairs. The tiny circle is placed at the intersection of the middle circle and the minute scale which is approximately 48’ from centre. I now know that Polaris and NCP are about this distance apart (although it’s changing with precession).
Now I need to learn how to orient the reticule. And whether I put NCP or Polaris in the tiny circle.
§
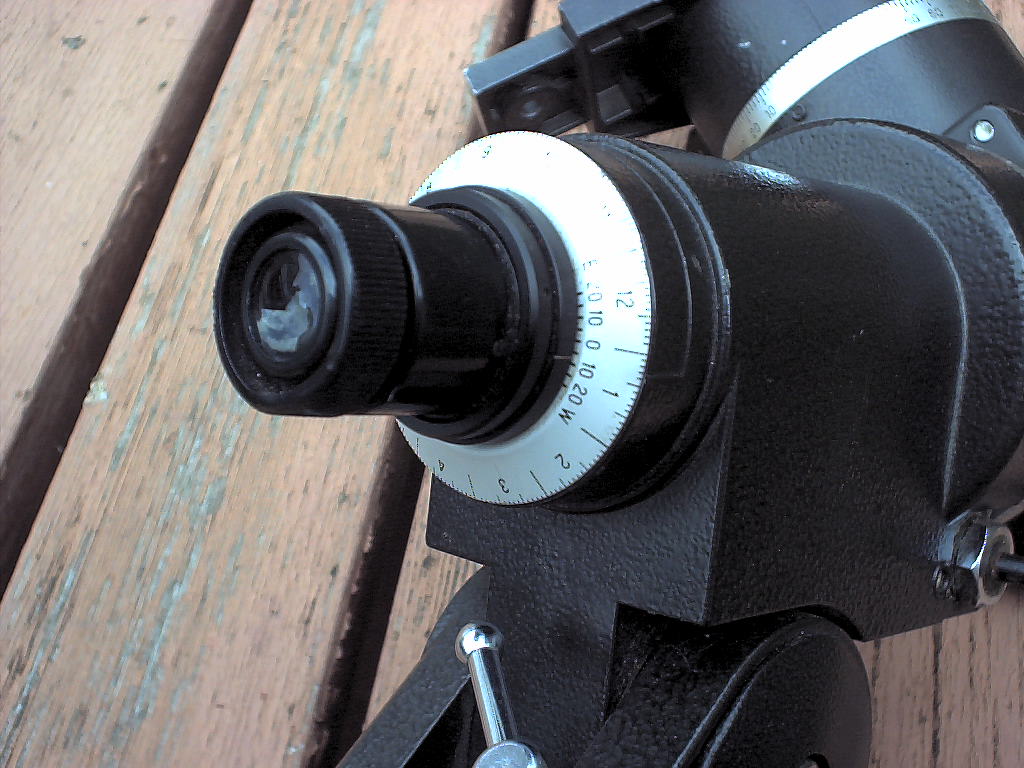
I stared at the mount.
I noticed that the conical ring was numbered from 1 to 12. At first I thought this might be a time indicator but I quickly dismissed this idea since it should go to 24 hours. As I looked more closely at it, I noticed subtle differences in spacing. For example, 1, 3, 5, 7, 8, 10, and 12 had a little bit of extra space; 2 had less space. Sections 4, 6, 9, and 11 were precisely divided into 30 subunits. It was clear: this was a year ring, divided into 12 months, with each month divided into days.
Near the December and January sections of the scale, I noticed markings on the inner part of the ring. It was a plus/minus scale running from 0 to 20 units each way. At the end of the scale was an E, on the left, and a W, on the right. This, I thought, corresponded to east and west longitude.
Finally, I noticed a white line grooved into the black ring hold the conical month gauge to the eyepiece.
What do these all mean, I wondered.
§
I started looking in earnest for information on the mount, the polar alignment telescope, and so on. Wow. Lots of discoveries...
Initially, I simply tried to find instructions about how to polar align the mount using the built-in polar axis scope with integrated reticule. But in short order I realised that this would require the use of the missing ring! Maybe that's why I've always struggled with this...
One of the first things I found is that
someone in the Netherlands was cognizant of people trying to better use their SP mounts but who had bought them used or for whatever reason didn't have the manuals. The web author subsequently scanned (to JPEG images) the cover and 18 pages of the
Super Polaris Equatorial Mount Telescope Instruction Booklet. I immediately downloaded this! The material exactly matches my mount which is very satisfying. It shows a reticule that is just like mine. Polaris goes inside the tiny circle. I have missing documentation, yahoo! The section on doing polar alignment (despite a significant typo) is very welcome.
The page scans for using the polar axis scope however, while large, are sufficiently poor resolution (and lossy) that I cannot make out some of the details in the photographs.
There's even information about aligning the polar axis scope itself, if need be. It is in this section that there exists a photo of the eyepiece area of the polar axis scope at the back of the mount. I can tell the orientation of the movable month ring based on the longitude graduation. But I cannot tell, for certain, the layout of the time ring. If I squint, it kind of looks like zero is at the top, 23 to the right, and 1 to the left.
I need to substantiate this. I decided to keep looking...
Preliminary searches reminded me that Vixen from Japan was the actual manufacturer of the mount. So I flopped around in the
Vixen Japanese web site briefly. Later I found the
Vixen North America site. Neither seemed to have really old or archival info. But I saw the Great Polaris (GP) mount was presently available and some of the features are the same as my old one. The GP Polar Axis Scope that you can buy today is unchanged—it would “bolt up” to my SP mount. (And they still sell the MT-1 RA or dec. clock drive. This is good to know!) There are a number of technical documents available as PDF files.
The “part 2” PDF was particularly interesting as it talked about aligning the GP mount in detail. It’s a keeper. This scanned presentation was much better than the JPEGs although black & white. That said, there were subtle differences with the setting circles and graduation rings. The RA setting circle is moved toward the polar scope eyepiece, it replaces the time graduation scale, it floats or spins like the RA circle should, it has a zero marker, and it has a lock. And, not surprisingly, the instructions performing an alignment are slightly different. I don’t know if I can decipher it and apply it to mine. I put it aside for later consideration.
I came across
Carsten Arnholm's astronomy site. Lots of great info and photos. He has numerous photos of his Vixen SP! While a different colour, this is like my unit. He also has a Vixen GP and the scanned GP manual (as JPEG files, high quality, in colour). I grabbed a few relevant pages.
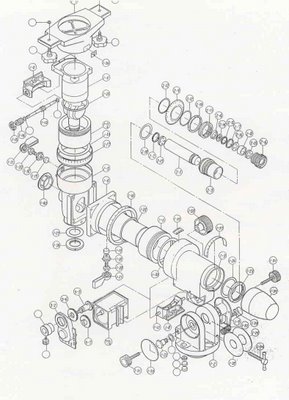 the Super Polaris equatorial mount system
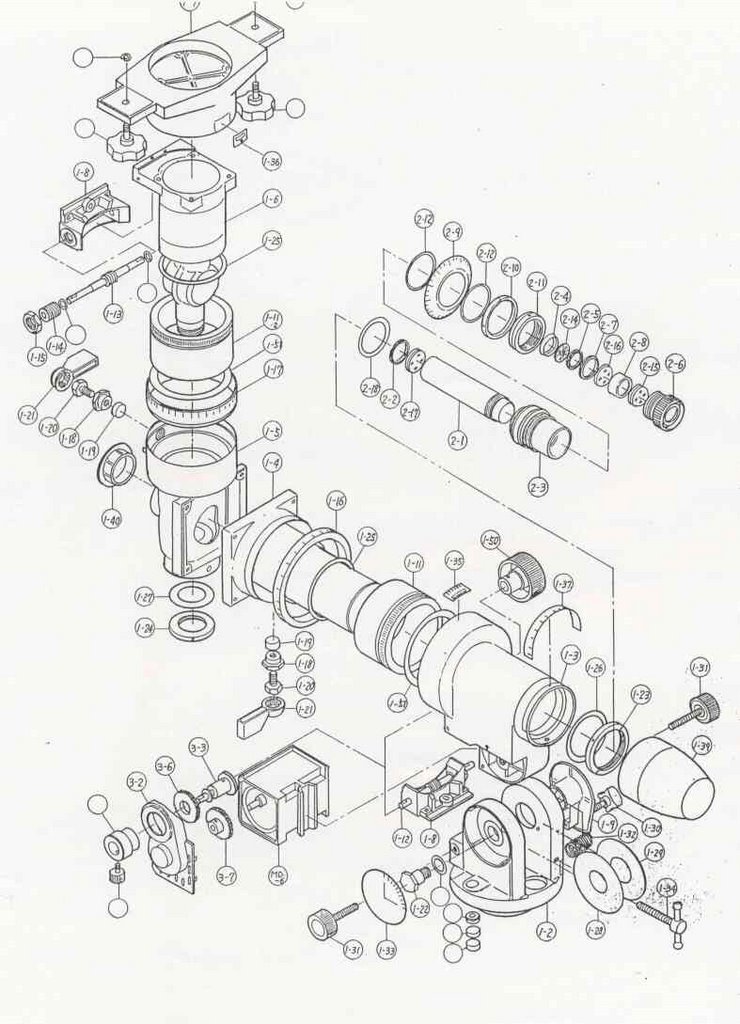
He's also got a fantastic image of the SP mount exploded! I wonder where he snagged that...
Carsten also comments briefly on astronomy software he's written and third-party tools he uses. In his notes on performing polar alignment, he refers to Jason Dale who's written a small shareware program called
PolarFinder. I downloaded and tried it out. Not bad. It looks like you can even substitute your own reticule image. That would be kinda cool if it actually does that...
Additional web searches lead me to
Company Seven. It appears to be a multi-faceted company with an astronomy store. They carry a number of Vixen products. They have some tantalizing accessories! And they have an online library with various instruction manuals including one covering the Vixen equatorial mount.
So after some concerted searches, I have found documentation, notes, and images for SP (and GP) mounts. Along the way I found a shareware app to help with polar alignment. A frustration however was that, while I now had the mount instructions, I had confirmed that a gauge (the time graduation ring) was missing from my SP mount. The instructions I have found refer to it but I cannot make out from the photos how the ring should be oriented.
§
The orientation of my old Meade (and new custom) Polaris reference circles did not seem right... I revisited this thinking that I need to corroborate all the different systems I have.
I chose a date and time (in
RedShift) when the NCP and Polaris (left and right respectively) were almost horizontally aligned. On 1 Sep 2006 this worked out to around 11:00pm EST. I was using the location of Toronto.
I first verified this using my National Geographic and glow-in-the-dark planispheres. And they proved consistent even though they’re generalised for a latitude around 40 degrees.
Then I fired up the recently downloaded
Polar Finder program (version 2.04). I set the time to 11:00pm with the daylight savings option turned on and I set the longitude to 79 degrees and 25 minutes west. A neat feature of the program is the ability to turn on or off an inverted telescope view. Once again, NCP and Polaris were horizontally arranged. And the (non-inverted) view corresponded.
Finally, I set the Meade reference circle to the matching date and time. Polaris and the NCP were at a slight angle. Odd. But then I tried something: I changed the time to 10:00pm, the time it would be if we were not using daylight savings.
I double checked this. We're -5 hours from Greenwich but in Toronto with daylight savings it changes that to -4.
So this makes me wonder if one should always use reference circles (and maybe even planispheres) by UT and local standard time and not local daylight savings time...
I also noticed that (if I understand how to use the reference circles correctly), if Polaris is to be placed on the time wheel precession scale, and the centre of the reference circle indicates the position of the NCP, then the reference circle presents an inverted view. That had only occurred to me recently to question the view presented by the reference circles.
§
I have noticed, based on the depression in the metal of the mount, that time graduation scale is not a full circle. It goes just over 50% of the way around, centred from the top. Given that a full circle represents 24 hours, the recessed area looks like it might cover about 14 hours of time. Time in darkness, perhaps?
I decided to make a new time ring out of paper.
With trusty Ikea measuring tape, I determined the circumference of the mount. I knew that the raised portion would increase the measurement slightly but only a negligible amount. It worked out to 7.185 inches.
In Adobe Illustrator I made a scale at the pre-measured amount with major ticks on each hour (on a 24 clock), medium ticks on the 30 minutes, and sub-ticks every 10 minutes. After cutting out the thin strip from the full sheet of paper, I wrapped it around the mount. It was a perfect fit!
 the new hour graduation scale
But then it occured to me that I did not know the proper orientation. Was zero up? Or was it biased or tuned some way?
This initiated another round of search engine inquiries to try to find a better photograph of the Super Polaris mount. But I did not encounter anything I had not already seen.
I kept returning to the first discovery, the scanned JPEG images of the SP mount instruction booklet.
Later, after rereading the GP mount instructions, I got the strong impression that the time graduation scale was oriented with zero to the top. So I decided to do an experiment. I took the mount outside and plopped it on the tripod. I levelled the tripod. I released the plate covering the latitude screw and let the mount lie horizontally. I sighted through the polar axis at a building across the street. I then released the RA clamp and turned the mount so the tiny Polaris circle was at the bottom of the viewed field. I tightened the RA clamp and fine-tuned the angle so to align with the brickwork of the building. I was not concerned that the building was so close; I was after a crude adjustment. With some Magic tape, I stuck my new time scale on the mount, with zero at the zenith. Then I turned the month ring and viola. The Oct 10 line was close to 1:00am (as noted in the instructions for aligning the polar axis scope)!
It became clear that the small amount of play I found on the index ring outside the month graduation ring will affect one’s longitude reading. It has about 4 degrees of play. I’ll try disassembling it to see if I can fix it.
Before tearing down, I reoriented the mount, using the date of 1 Sep 2006, the time of 11:00pm, and a 4 degree offset to the west from the standard meridian of 75 degrees. I looked through the polar axis scope and the NCP and Polaris orientation was nearly horizontal. Yes!
So without visual proof I was pretty sure I’ve got it figured out.
§
In my travels, I encountered
John B’s astronomy site [offline as of April 2007]. Among the astrophotographs and notes, he had some shots of his equipment. He has a black SP mount just like mine. Unfortunately, none of the photos showed the end of the mount. I couldn’t see the time graduation ring. So I checked when the site was last updated: July 2006! Cool, it’s current.
I emailed John to see if he might have additional photos of his Super Polaris mount. He responded from Florida within a day and generously offered to pull the mount from his storage and shoot photos. Wow!
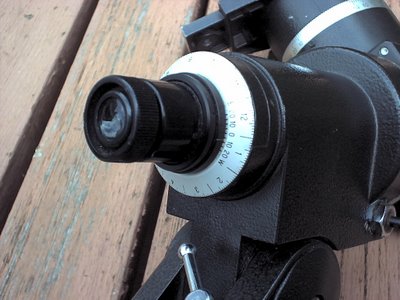
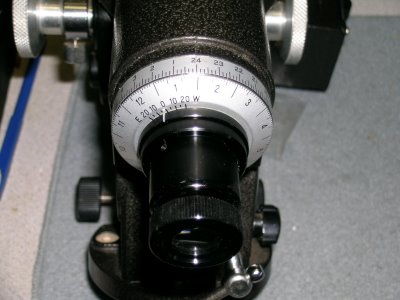 month and time scales on Super Polaris mount
His excellent photos verified my suspicions: zero is at the top. Finally, the missing clue!
§
When I bought my telescope, I now see, there were a number of items missing. And since then a few bits have fallen off.
- Super Polaris mount instruction manual [now have an e-copy]
- cap for the opening to the polar axis scope (part # I-40)
- end cap to protect polar axis eyepiece (part # I-39)
- time graduation C-shaped plate (part # I-37) [made it myself]
- declination setting circle pointer plate (part # I-36) [made an upgrade]
- snap rings or e-clips (2) for the telescope tube ring mounting screws (part # not shown)
- and, of course, I don't have the motor drive...
(Part numbers from the exploded diagram.)
I've got some work to do to get this thing back to its original condition... I'm very interested in having the end caps to, in the future, to keep the polar scope optics clean. And to offer some protection from damage (I can tell my mount's been dropped).
§
I came across a couple of other interesting sites:
Someone noted a little Windows application called
NiteView (for Windows 95/98) that changes the screen colours to red-tinged. It seems to shut off Task Bar and hide the desktop icons. I haven’t downloaded it. Partly because I already created my own dark red colour desktop scheme for the laptop.
I also came across another DIY observatory. I'm going to start a gallery for these, I think...
I also saw a few cases for mounts. I like!
§
Started playing around more with the Meade Polaris reference circle, testing it against
RedShift. Is it messed up? It does not work for where I am. I think Polaris reference circles are longitudinally specific!
On a hunch, I set
RedShift to 1 Oct 1990 at 9:00pm. In Los Angeles, California (where Meade and Celestron are based)... I set the reference circle to the same date and time. I turned it upside. It matches. I tried another location. It doesn’t match. After a lot more fiddling, I can’t figure it out. It doesn’t make any sense.
Either this is a poor way to determine NCP/Polaris orientation or I'm doing something really wrong...
Anyway, I don’t care. I’m not going to use it anymore.
§
I noticed an adjustment in the GP mount instructions manual. Page 14 has the original 1:00am covered; it now shows 1:20am.
I’m not sure what motivated this adjustment. Typo? Precision? Precession?
§
I’m very happy. I've accomplished what I wanted. After days of research I have found out how to use the integrated polar axis scope to align the Super Polaris German equatorial mount to the North Celestial Pole. I’m increasingly satisfied with this method. I'm also very pleased to have seen many positive reviews of the mount. I noted a number people saying that it was easy and quick to polar align and would yield accurate results. Happily I can avoid the use of the reference circles, which are confounding me. I’ve found a few interesting web sites. And I’m on my way to fixing and improving my SP mount.
Lots of reading to do.
Thus endth the long tirade.