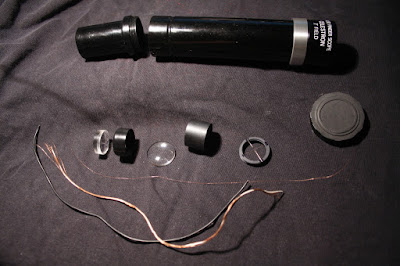
Had a look through the old Celestron finder scope. And, once again, I was not convinced the cross hairs were centred. Very gently I nudged one. It still didn't look right. Meh.
I wanted to test it. So I made a jig. Simply a small box to cradle or hold the finder tube. I cut appropriate sized holes on opposite sides to fit the tube snugly. Strapped it to a camera tripod. I was then able to gently twist the tube. Confirmed! I could see the cross hairs clearly rotating around a centre point.
I get it that in doesn't matter, in a telescope-finder scope application, particularly if the finder scope is fixed, i.e. does not rotate. One aligns for the cross. And you're done. But with a rotating finder, like my bigger Orion, and for this repurposed unit, now on the barn door tracker, for polar alignment, it's rather important! As much as possible, I want these wires centred.
A quick search on Google turned up an article on Ice In Space by RG. He showed how to disassemble the finder, procure new thin wires, tension them, and glue in place. This is what I decided to do.
Tore down my finder. Yikes. Almost dropped the air-spaced eye lenses (the ocular)! Set them aside in the correct orientation. Put aside the long spacer and closely examined the cross hair ring. I believe the thin copper wires have stretched over the 25+ years and/or the glue has relaxed.
The key step would be to find some very small gauge wire. Happily, in the rolly-polly parts bin, I stumbled across an old busted mobile phone ear bud/mic. Cut open the lead wires to find loose, fine copper. The gauge looks exactly the same! All right.
§
Next steps are to remove the old wires, remove the old glue, determine the correct weight to tension the wires, find a pedestal, install, glue, and let cure.
§
Remembered when Gilles repaired his finder after I almost set it on fire.
Friday, February 12, 2016
Subscribe to:
Post Comments (Atom)


No comments:
Post a Comment